[수업 목표]
- Flask 프레임워크를 활용해서 API를 만들 수 있다.
- '버킷리스트'를 완성한다.
- EC2에 내 프로젝트를 올리고, 자랑한다!
01. 버킷리스트 프로젝트 세팅
1) 문제 분석 - 완성작부터 보기 : [ http://spartacodingclub.shopweb/bucket ]
2) 프로젝트 설정 - flask 폴더 구조 만들기 : static, templates 폴더 + app.py
3) 패키지 설치하기 : flask, pymongo, dnspython
01 - 1. 뼈대 준비하기
app. py
from flask import Flask, render_template, request, jsonify
app = Flask(__name__)

@app.route('/')
def home():
   return render_template('index.html')

@app.route("/bucket", methods=["POST"])
def bucket_post():
    sample_receive = request.form['sample_give']
    print(sample_receive)
    return jsonify({'msg': 'POST(기록) 연결 완료!'})

@app.route("/bucket/done", methods=["POST"])
def bucket_done():
    sample_receive = request.form['sample_give']
    print(sample_receive)
    return jsonify({'msg': 'POST(완료) 연결 완료!'})

@app.route("/bucket", methods=["GET"])
def bucket_get():
    return jsonify({'msg': 'GET 연결 완료!'})

if __name__ == '__main__':
   app.run('0.0.0.0', port=5000, debug=True)
index.html
<!DOCTYPE html>
<html lang="en">
<head>
    <meta charset="UTF-8">
    <meta http-equiv="X-UA-Compatible" content="IE=edge">
    <meta name="viewport" content="width=device-width, initial-scale=1.0">

    <link href="https://cdn.jsdelivr.net/npm/bootstrap@5.0.2/dist/css/bootstrap.min.css" rel="stylesheet"
        integrity="sha384-EVSTQN3/azprG1Anm3QDgpJLIm9Nao0Yz1ztcQTwFspd3yD65VohhpuuCOmLASjC" crossorigin="anonymous">
    <script src="https://ajax.googleapis.com/ajax/libs/jquery/3.5.1/jquery.min.js"></script>
    <script src="https://cdn.jsdelivr.net/npm/bootstrap@5.0.2/dist/js/bootstrap.bundle.min.js"
        integrity="sha384-MrcW6ZMFYlzcLA8Nl+NtUVF0sA7MsXsP1UyJoMp4YLEuNSfAP+JcXn/tWtIaxVXM"
        crossorigin="anonymous"></script>

    <link href="https://fonts.googleapis.com/css2?family=Gowun+Dodum&display=swap" rel="stylesheet">

    <title>인생 버킷리스트</title>

    <style>
        * {
            font-family: 'Gowun Dodum', sans-serif;
        }
        .mypic {
            width: 100%;
            height: 200px;

            background-image: linear-gradient(0deg, rgba(0, 0, 0, 0.5), rgba(0, 0, 0, 0.5)), url('https://images.unsplash.com/photo-1601024445121-e5b82f020549?ixid=MnwxMjA3fDB8MHxwaG90by1wYWdlfHx8fGVufDB8fHx8&ixlib=rb-1.2.1&auto=format&fit=crop&w=1189&q=80');
            background-position: center;
            background-size: cover;

            color: white;

            display: flex;
            flex-direction: column;
            align-items: center;
            justify-content: center;
        }
        .mypic > h1 {
            font-size: 30px;
        }
        .mybox {
            width: 95%;
            max-width: 700px;
            padding: 20px;
            box-shadow: 0px 0px 10px 0px lightblue;
            margin: 20px auto;
        }
        .mybucket {
            display: flex;
            flex-direction: row;
            align-items: center;
            justify-content: space-between;
        }

        .mybucket > input {
            width: 70%;
        }
        .mybox > li {
            display: flex;
            flex-direction: row;
            align-items: center;
            justify-content: center;

            margin-bottom: 10px;
            min-height: 48px;
        }
        .mybox > li > h2 {
            max-width: 75%;
            font-size: 20px;
            font-weight: 500;
            margin-right: auto;
            margin-bottom: 0px;
        }
        .mybox > li > h2.done {
            text-decoration:line-through
        }
    </style>
    <script>
        $(document).ready(function () {
            show_bucket();
        });
        function show_bucket(){
            $.ajax({
                type: "GET",
                url: "/bucket",
                data: {},
                success: function (response) {
                    alert(response["msg"])
                }
            });
        }
        function save_bucket(){
            $.ajax({
                type: "POST",
                url: "/bucket",
                data: {sameple_give:'데이터전송'},
                success: function (response) {
                    alert(response["msg"])
                }
            });
        }
        function done_bucket(num){
            $.ajax({
                type: "POST",
                url: "/bucket/done",
                data: {sameple_give:'데이터전송'},
                success: function (response) {
                    alert(response["msg"])
                }
            });
        }
    </script>
</head>
<body>
    <div class="mypic">
        <h1>나의 버킷리스트</h1>
    </div>
    <div class="mybox">
        <div class="mybucket">
            <input id="bucket" class="form-control" type="text" placeholder="이루고 싶은 것을 입력하세요">
            <button onclick="save_bucket()" type="button" class="btn btn-outline-primary">기록하기</button>
        </div>
    </div>
    <div class="mybox" id="bucket-list">
        <li>
            <h2>✅ 호주에서 스카이다이빙 하기</h2>
            <button onclick="done_bucket(5)" type="button" class="btn btn-outline-primary">완료!</button>
        </li>
        <li>
            <h2 class="done">✅ 호주에서 스카이다이빙 하기</h2>
        </li>
        <li>
            <h2>✅ 호주에서 스카이다이빙 하기</h2>
            <button type="button" class="btn btn-outline-primary">완료!</button>
        </li>
    </div>
</body>
</html>
mongoDB Atlas 띄우기
01 - 2. POST연습(기록하기)
API 만들고 사용하기 - 버킷리스트 기록 API (Create→ POST)
- 요청 정보 : URL= /bucket, 요청 방식 = POST
- 클라(ajax) → 서버(flask) : bucket
- 서버(flask) → 클라(ajax) : 메시지를 보냄 (기록 완료!)
단! 서버에서 한 가지 일을 더 해야합니다. → 번호를 만들어 함께 넣어주는 것. 그래야 업데이트가 가능하겠죠!
1) 클라이언트와 서버 연결 확인하기
서버 코드 - app.py
@app.route("/bucket", methods=["POST"])
def bucket_post():
    sample_receive = request.form['sample_give']
    print(sample_receive)
    return jsonify({'msg': 'POST(기록) 연결 완료!'})
클라이언트 코드 - index.html
function save_bucket(){
    $.ajax({
        type: "POST",
        url: "/bucket",
        data: {sample_give:'데이터전송'},
        success: function (response) {
            alert(response["msg"])
        }
    });
}

<button onclick="save_bucket()" type="button" class="btn btn-outline-primary">기록하기</button>
2) 서버 만들기
- bucket 정보를 받아서, 저장하면 되겠죠?
- 단, 한 가지 일이 더 있답니다. → 네, 버킷 번호 와 완료여부 를 함께 넣어주는 것!
- 우리가 일전에 만들어둔 [dbtest.py]파일도 불러와봅시다!
- 재밌는 사실! 아래 코드도 살펴봅시다.
count = list(db.bucket.find({},{'_id':False}))
num = len(count) + 1

vs

count = db.bucket.find({},{'_id':False}).count()
num = count + 1
@app.route("/bucket", methods=["POST"])
def bucket_post():
    bucket_receive = request.form["bucket_give"]

    count = db.bucket.find({},{'_id':False}).count()
    num = count + 1

    doc = {
        'num':num,
        'bucket': bucket_receive,
        'done':0
    }

    db.bucket.insert_one(doc)
    return jsonify({'msg':'등록 완료!'})
3) 클라이언트 만들기
쉬워요! bucket 정보만 보내주면 되겠죠?
function save_bucket(){
    let bucket = $('#bucket').val()
    $.ajax({
        type: "POST",
        url: "/bucket",
        data: {bucket_give:bucket},
        success: function (response) {
            alert(response["msg"])
            window.location.reload()
        }
    });
}
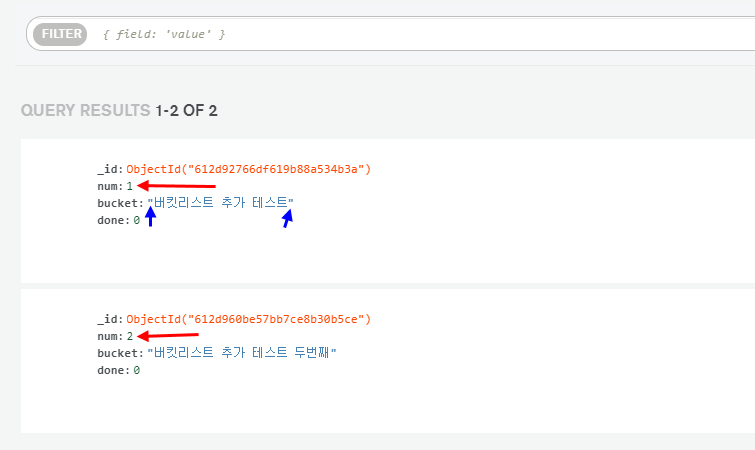
4) 완성 확인하기
DB에 잘 들어갔는지 확인
01 - 3. GET연습하기(보여주기)
API 만들고 사용하기 - 버킷리스트 조회 API (Read→ GET)
- 요청 정보 : URL= /bucket, 요청 방식 = GET
- 클라(ajax) → 서버(flask) : (없음)
- 서버(flask) → 클라(ajax) : 전체 버킷리스트를 보여주기
1) 클라이언트와 서버 연결 확인하기
[서버 코드 - app.py]
@app.route("/bucket", methods=["GET"])
def bucket_get():
    return jsonify({'msg': 'GET 연결 완료!'})
[클라이언트 코드 - index.html]
$(document).ready(function () {
    show_bucket();
});
function show_bucket(){
    $.ajax({
        type: "GET",
        url: "/bucket",
        data: {},
        success: function (response) {
            alert(response["msg"])
        }
    });
}
2) 서버 만들기
- 받을 것 없이 buckets에 주문정보를 담아서 내려주기만 하면 됩니다!
@app.route("/bucket", methods=["GET"])
def bucket_get():
    buckets_list = list(db.bucket.find({},{'_id':False}))
    return jsonify({'buckets':buckets_list})
3) 클라이언트 만들기
- 응답을 잘 받아서 for 문으로! 붙여주면 끝이겠죠!
function show_bucket(){
    $('#bucket-list').empty()
    $.ajax({
        type: "GET",
        url: "/bucket",
        data: {},
        success: function (response) {
            let rows = response['buckets']
            for (let i = 0; i < rows.length; i++) {
                let bucket = rows[i]['bucket']
                let num = rows[i]['num']
                let done = rows[i]['done']

                let temp_html = ``
                if (done == 0) {
                    temp_html = `<li>
                                    <h2>✅ ${bucket}</h2>
                                    <button onclick="done_bucket(${num})" type="button" class="btn btn-outline-primary">완료!</button>
                                </li>`
                } else {
                    temp_html = `<li>
                                    <h2 class="done">✅ ${bucket}</h2>
                                </li>`
                }
                $('#bucket-list').append(temp_html)
            }
        }
    });
}
4) 완성 확인하기
01 - 4. POST연습하기(완료하기)
API 만들고 사용하기 - 버킷리스트 완료 API (Update→ POST)
- 요청 정보 : URL= /bucket/done, 요청 방식 = POST
- 클라(ajax) → 서버(flask) : num (버킷 넘버)
- 서버(flask) → 클라(ajax) : 메시지를 보냄 (버킷 완료!)
1) 클라이언트와 서버 연결 확인하기
[서버 코드 - app.py]
@app.route("/bucket/done", methods=["POST"])
def bucket_done():
    sample_receive = request.form['sample_give']
    print(sample_receive)
    return jsonify({'msg': 'POST(완료) 연결 완료!'})
[클라이언트 코드 - index.html]
function done_bucket(num){
    $.ajax({
        type: "POST",
        url: "/bucket/done",
        data: {sameple_give:'데이터전송'},
        success: function (response) {
            alert(response["msg"])
        }
    });
}

<button onclick="done_bucket(5)" type="button" class="btn btn-outline-primary">완료!</button>
2) 서버 만들기
- 버킷 번호를 받아서, 업데이트 하면 됩니다!
- 그.런.데! num_receive 는 문자열로 들어오니까, 숫자로 바꿔주는 것이 중요합니다!
@app.route("/bucket/done", methods=["POST"])
def bucket_done():
    num_receive = request.form["num_give"]
    db.bucket.update_one({'num': int(num_receive)}, {'$set': {'done': 1}})
    return jsonify({'msg': '버킷 완료!'})
3) 클라이언트 만들기
- 버킷 넘버를 보여주면 됩니다! 버킷 넘버는? HTML이 만들어질 때 적히게 되죠!

function done_bucket(num){
    $.ajax({
        type: "POST",
        url: "/bucket/done",
        data: {'num_give':num},
        success: function (response) {
            alert(response["msg"])
            window.location.reload()
        }
    });
}
4) 완성 확인하기
02. 내 프로젝트를 서버에 올리기
"웹서비스 런칭" 에 필요한 개념 소개
- 웹 서비스를 런칭하기 위해 클라이언트의 요청에 항상 응답해줄 수 있는 서버에 프로젝트를 실행시켜줄 거에요.
- 언제나 요청에 응답하려면,
- 컴퓨터가 항상 켜져있고 프로그램이 실행되어 있어야하고,
- 모두가 접근할 수 있는 공개 주소인 공개 IP 주소(Public IP Address)로 나의 웹 서비스에 접근할 수 있도록 해야해요.
- 서버는 그냥 컴퓨터라는거 기억나시죠? 외부 접속이 가능하게 설정한 다음에 내 컴퓨터를 서버로 사용할 수도 있어요.
- 우리는 AWS 라는 클라우드 서비스에서 편하게 서버를 관리하기 위해서 항상 켜 놓을 수 있는 컴퓨터인 EC2 사용권을 구입해 서버로 사용할 겁니다.
AWS E2C 서버 사기 : https://ap-northeast-2.console.aws.amazon.com/ec2/v2/home?region=ap-northeast-2
https://ap-northeast-2.console.aws.amazon.com/ec2/v2/home?region=ap-northeast-2
ap-northeast-2.console.aws.amazon.com
AWS EC2에 접속하기
- Window: ssh가 없으므로, git bash라는 프로그램을 이용!
- gitbash를 실행하고, 아래를 입력!
ssh -i 받은키페어를끌어다놓기 ubuntu@AWS에적힌내아이피
- 예) 아래와 비슷한 생김새!
ssh -i /path/my-key-pair.pem ubuntu@13.125.250.20
- Key fingerprint 관련 메시지가 나올 경우 Yes를 입력해주세요!
- git bash를 종료할 때는 exit 명령어를 입력하여 ssh 접속을 먼저 끊어주세요.
간단한 리눅스 명령어
- 팁! 리눅스 커널에서 윗화살표를 누르면 바로 전에 썼던 명령어가 나옵니다.
ls: 내 위치의 모든 파일을 보여준다.

pwd: 내 위치(폴더의 경로)를 알려준다.

mkdir: 내 위치 아래에 폴더를 하나 만든다.

cd [갈 곳]: 나를 [갈 곳] 폴더로 이동시킨다.

cd .. : 나를 상위 폴더로 이동시킨다.

cp -r [복사할 것] [붙여넣기 할 것]: 복사 붙여넣기

rm -rf [지울 것]: 지우기

sudo [실행 할 명령어]: 명령어를 관리자 권한으로 실행한다.
sudo su: 관리가 권한으로 들어간다. (나올때는 exit으로 나옴)
02 - 1. 서버 세팅하기
서버 환경 통일하기 : 우리는 지금 막! 컴퓨터를 구매한 상태예요.
여기에 이런저런 세팅들(업그레이드, DB설치, 명령어 통일 등)을 해줘야 본격적으로 이용할 때 편리하답니다!
- EC2 한방에 세팅하기
# python3 -> python
sudo update-alternatives --install /usr/bin/python python /usr/bin/python3 10

# pip3 -> pip
sudo apt-get update
sudo apt-get install -y python3-pip
sudo update-alternatives --install /usr/bin/pip pip /usr/bin/pip3 1

# port forwarding
sudo iptables -t nat -A PREROUTING -i eth0 -p tcp --dport 80 -j REDIRECT --to-port 5000
filezilla를 이용해서, 간단한 python 파일을 올려봅니다.
- 서버에 업로드 할 간단한 파일을 작성합니다.
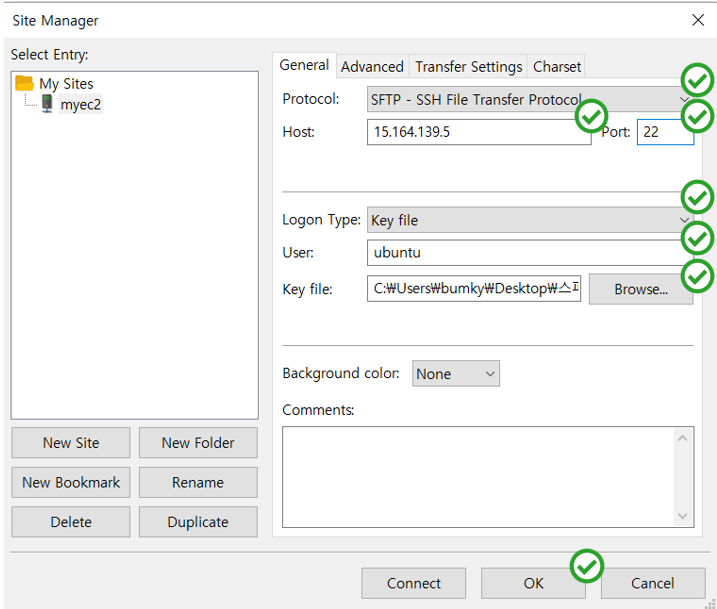
- 파일질라 실행, 다음과 같이 설정
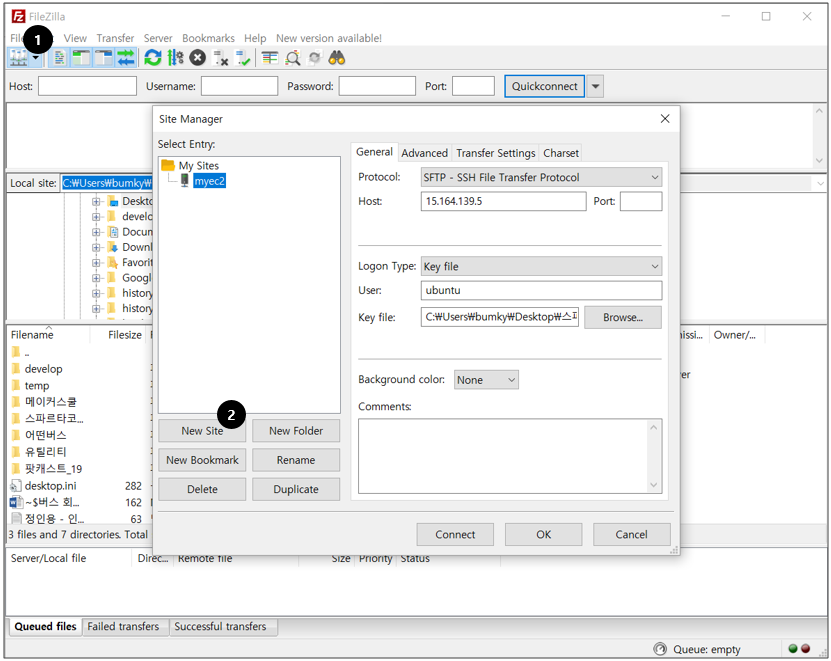
- 정보들을 입력하고, ok 누르면 서버의 파일들을 볼 수 있음 (Host: 내 EC2서버의 ip // User: ubuntu 로 입력)
- 마우스로 드래그 해서 파일을 업로드/다운로드하면 됩니다!
- 왼쪽이 내 컴퓨터 vs 오른쪽이 내가 방금 산 컴퓨터
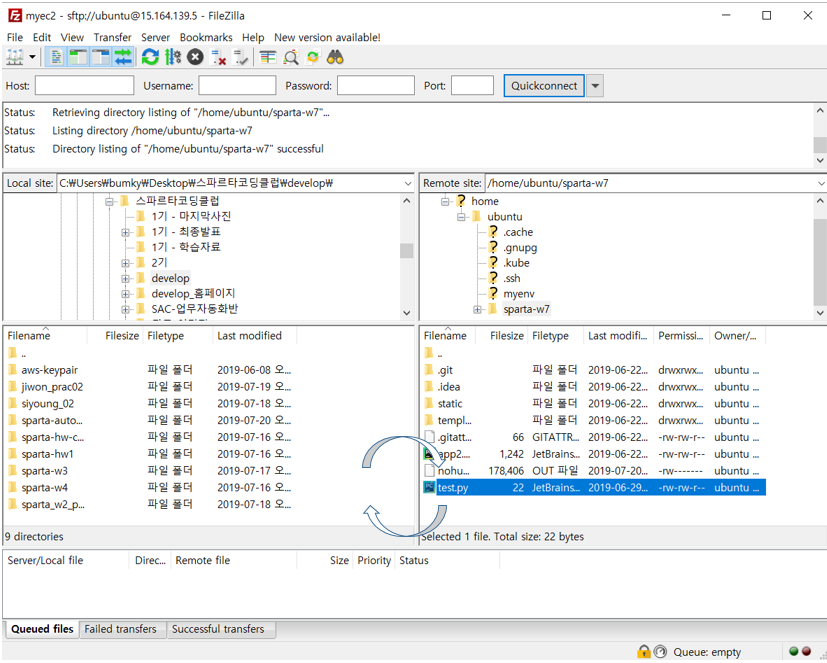
- 파이썬 파일을 실행해보기
python test.py[한 걸음 더] 서버 환경 세팅 - 한 줄씩 설명
1. 파이썬 (python3 → python)
- python3 명령어를 python으로 사용할 수 있게 하는 명령어
2. pip (pip3 → pip)
한 줄 씩 복사 붙여넣기!
- 1) pip3 설치
- 2) pip3 명령어를 pip으로 사용할 수 있게 하는 명령어
- * 한 줄 씩 복사 붙여넣기!
# pip3 설치
sudo apt-get update
sudo apt-get install -y python3-pip

# pip3 대신 pip 라고 입력하기 위한 명령어
sudo update-alternatives --install /usr/bin/pip pip /usr/bin/pip3 1
3. 포트포워딩 (80포트 → 5000포트)
80포트로 들어오는 요청을 5000포트로 넘겨주는 명령어
sudo iptables -t nat -A PREROUTING -i eth0 -p tcp --dport 80 -j REDIRECT --to-port 5000
02 - 2. Flask 서버를 실행해보기
1) 팬명록 완성본을 파일질라로 EC2에 업로드
- 파일질라에서 homework 폴더 째로 드래그 드롭으로 EC2 인스턴스의 home/ubuntu 폴더에 업로드합니다.
2) pip로 패키지 설치
pip install flask pymongo dnspython3) 브라우저로 접속해보기
크롬 브라우저 창에 아래와 같이 입력합니다.

http://[내 EC2 IP]:5000/
아직 작동하지 않는다
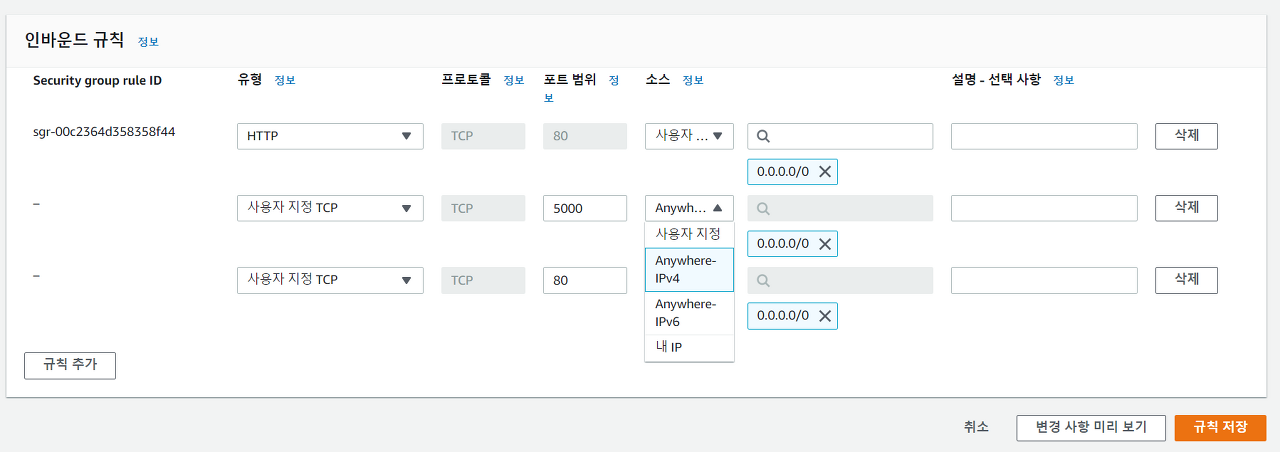
4) AWS에서 5000포트를 열어주기
- EC2 서버(=가상의 내 컴퓨터)에서 포트를 따로 설정하는 것 외에도, AWS EC2에서도 자체적으로 포트를 열고/닫을 수 있게 관리를 하고 있습니다.
- → 그래서 AWS EC2 Security Group에서 인바운드 요청 포트를 열어줘야 합니다.
- 일단, EC2 관리 콘솔로 들어갑니다. 그리고 보안그룹(영문: Security Group)을 눌러 들어갑니다. 여기선 launch-wizard-1 이라고 쓰여 있네요

- 해당 보안그룹을 클릭합니다.

- Edit inbound rules를 선택합니다

- 두 가지 포트를 추가해봅니다. Anywhere-IPv4 를 클릭해주세요!→ 5000포트: flask 기본포트
→ 80포트: HTTP 접속을 위한 기본포트
→ 5000포트: flask 기본포트
어떻게 되는걸까? 포트 번호 없애기 - 기본 개념
- 지금은 5000포트에서 웹 서비스가 실행되고 있습니다. 그래서 매번 :5000 이라고 뒤에 붙여줘야 하죠. 뒤에 붙는 포트 번호를 없애려면 어떻게 해야할까요?
- http 요청에서는 80포트가 기본이기 때문에, 굳이 :80을 붙이지 않아도 자동으로 연결이 됩니다.
- 포트 번호를 입력하지 않아도 자동으로 접속되기 위해, 우리는 80포트로 오는 요청을 5000 포트로 전달하게 하는 포트포워딩(port forwarding) 을 사용하겠습니다.
- 리눅스에서 기본으로 제공해주는 포트포워딩을 사용할 것입니다. 그림으로 보면 아래와 같습니다.

다시 접속해보자 : http://내아이피
02 - 3. nohup 설정하기
SSH 접속을 끊어도 서버가 계속 돌게 하기
# 아래의 명령어로 실행하면 된다
nohup python app.py &
서버 종료하기 - 강제종료하는 방법
ps -ef | grep 'python app.py' | awk '{print $2}' | xargs kill
02 - 4. 도메인 연결하기
- 도메인 구입/연결
- 도메인을 구매한다는 것은, 네임서버를 운영해주는 업체에, IP와 도메인 매칭 유지비를 내는 것입니다. 한국 또는 글로벌 업체 어디든 상관 없지만, 우리는 한국의 '가비아'라는 회사에서 구입해보겠습니다.
- 가비아 접속하기
- 링크: https://dns.gabia.com/
웹을 넘어 클라우드로. 가비아
dns.gabia.com
(DNS 설정 클릭)

(호스트 이름에 @, IP주소에 IP주소를 입력합니다)

(이렇게!)
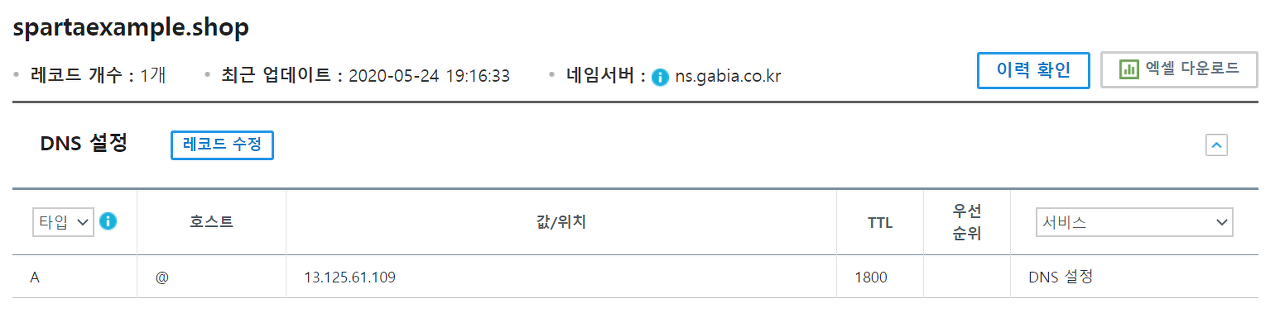
내 IP주소로 지금 flask 서버가 잘 돌고 있나요? 먼저 확인해봅니다. : <http://내AWS아이피/>
약간의 시간을 가진 후, 내 도메인으로 접근하면, 접속이 됩니다. : <http://내도메인/>
3. og태그
og 태그 만들기
- 스파르타피디아에서 배웠던 og:image, og:title, og:description 태그 기억하시나요?
- 내 프로젝트도 카톡/페이스북/슬랙에 공유했을 때 예쁘게 나오도록, 미리 꾸며봅시다!
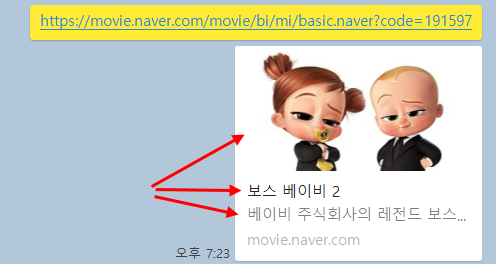
- static 폴더 아래에 이미지 파일을 넣고, 각자 프로젝트 HTML의 <head>~</head> 사이에 아래 내용을 작성하면 og 태그를 개인 프로젝트에 사용할 수 있습니다.
og태그 넣기
<meta property="og:title" content="내 사이트의 제목" />
<meta property="og:description" content="보고 있는 페이지의 내용 요약" />
<meta property="og:image" content="이미지URL" />

- 참고! 이미지를 바꿨는데 이전 ogimage가 그대로 나와요!
- 그것은 페이스북/카카오톡 등에서 처음 것을 한동안 저장해놓기 때문입니다.
- 페이스북 og 태그 초기화 하기: https://developers.facebook.com/tools/debug/
- 카카오톡 og 태그 초기화 하기: https://developers.kakao.com/tool/clear/og
5주차 숙제 : 내 도메인 제출하기
성시경 팬명록
응원 한마디 남기고 가세요!
waveswaves.shop
'스파르타코딩클럽 > 웹개발 종합반' 카테고리의 다른 글
| 스파르타 코딩클럽 웹개발 4주차 (0) | 2022.08.31 |
|---|---|
| 스파르타 코딩클럽 웹개발 3주차 (0) | 2022.08.30 |
| 스파르타 코딩클럽 웹개발 2주차 (0) | 2022.08.26 |
| 스파르타 코딩클럽 웹개발 1주차 (0) | 2022.08.23 |


